
Click here for more money saving! Rakuten will get you cash back for purchases you already make!
Let me give you a little background first….
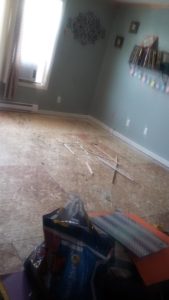
Single Mom here! I have a bad back and (at the time) a total lack of carpentry skills. I found myself on my living room floor one lonely Saturday night. I was absolutely horrified at how disgusting my carpet had gotten. It was a carmel colored carpet that I’m pretty sure got it’s color from grossness and not the manufacturer. The floor had more weird mysterious spots than I could count. I just wanted to barf. It came with the house and the house was over 10 years old. I always tried to scrub it but it was always this nasty weird color!! It didn’t help that my living room was right in the entrance. Everyone tracked dirt and grime in. YUCK!

I had been saving for vacation and really didn’t want to spend the money on hiring a contractor to give me the gorgeous wood floors I dreamed about. But I couldn’t stand to look at those carpets either. UGHHH
Just look at this picture I found of when my son was younger. I laugh about it now but you get what I was up against. Kids are so gross. LOL

So, what did I do?
I did my research and then ran to Home Depot. I still had no idea what I was doing though haha. I was absolutely terrified!! There I met some amazing employees that helped me decide what was right for me and what I needed to make my living room amazing. Thank God for them!
You’re never going to believe this but it’s just

peel and stick tile!! Yes. Peel and Stick!! How cool is that?! And guess what, you can just cut it with scissors! No hack saw or saw of any kind. Heaven girls. HEAVEN.
You may ask yourself, “Does it really stay stuck though?” It most certainly does! I’ve had this flooring for two years now and not one piece has come up. And that is all the while, going through four children and all of their spills! I also use a steamer that I’m sure you’re not supposed to use but I do. LOL It still stays put! Couches moved around, a new puppy, kittens, shoes, mud, snow suits and all of the snow melting, etc. And my floor is absolutely perfect STILL.
I actually did this project as a quick fix to appease my stress level and nauseated stomach. But it’s been two years and I’m going to extend it into the kitchen and dining area! I love it so much.
Ok let’s dive in.
Before you start, this is what you need.
Flooring (calculate and measure your space before you buy!)
This is the exact flooring that I bought and LOVE. I went with a dark color to hide the grime and dirt easier.
Knee Pads
These are purely optional. I used them because it did a number on my knees due to sharp staples and metal that I pulled out.

Tape Measure

Scissors or Utility Blade

You can use scissors but I found that it cut crooked no matter how hard I tried. Instead I got a utility knife and an old block of wood to do my cutting. It worked much better.
Needle Nose Pliers and Flat Head Screw Driver


Bond Enhancer

Do not skip this step! This Enhancer really makes a difference.
Paint Roller and Tray

Now you’re ready to start!
I will warn you, the first steps and the longest and hardest, so be prepared.
- Move all of the furniture and millions of toys out of the living room. Why is there always so much stuff under the couch?! So yeah, move all of that stuff too. YUCK.

2. Rip up the carpet. DOUBLE YUCK! Blech. Gag. Ew. And be prepared to sit on the floor for hours pulling out 5 billion staples. Be careful! The tack strips they use to hold the carpet in place are super sharp. I used knee pads, gloves, and needle nose pliers for this part. A lot of sweat and swearing later and it was done.
3. Sweep EVERYTHING!!! I mean everything. Every crevice and nook. Then vacuum. This is super important. You must get everything up. I even got down on my hands and knees and felt around for staples that I missed. You don’t want anything poking through your floors once they are done.
4. Next you’re going to want to mop the entire floor with a mild soapy water. You’ll realize at this point some more places with staples because it will catch on the mop. At this point in time, I was completely exhausted and just ate dinner and went to bed. The floor needs to dry a good 8 hours anyhow.
5. The next step is the Enhancer. This makes the floor a little sticky and tacky which really helps bond the sticky tile. To do this, all you need to do is pour the bottle in a paint tray and roll it on like you would paint. I used a long paint stick for my roller. This part was actually the easiest and most relaxing for me. It doesn’t smell that bad and it goes on super easy. You’ll notice it start to turn clear pretty quickly. Now I have a 12 x 15 foot living room and I used two bottles of this stuff.
6. After your Enhancer has dried, start sticking your tiles down!
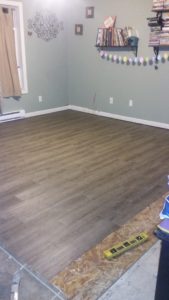
This is the last part! This will go so fast, I promise you! Please make sure that you stagger the seems so they aren’t all the same. BAD IDEA for the floor if you do that. I started laying my tiles on the inside corner and worked my way outwards. Whatever works best for you. Whenever you hit an area that needs cut, just measure it and cut with scissors or slice with your utility knife. That easy! Just make sure the paper is still on the back or you’ll have sticky scissors and a mess.

I love it whenever people get together and share thoughts. Great blog, stick with it!
Great
Thanks so much